Ultraflex Flexible Liner Installation Guide
Before you install your liner:
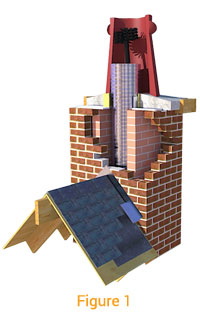
Ensure your brick chimney stack has been thoroughly swept, cleaned and is clear of any debris. Carry out any rectification work on the exposed section of the chimney stack prior to installing your flexible flue liner e.g. re-pointing. (See Figure 1).
Unpacking the liner:
When unpacking the liner, remove packaging and uncoil from the outside. Uncoiling from the inside will potentially exceed the maximum curvature radii of the liner, cause damage to its structure and void the warranty.
The nominal size of the liner:
A minimum of 25mm between the flue liner and the wall of the chimney stack must be maintained along the full length of the liner. For example, in a 9”x 9” chimney, a maximum of a 7” liner should be used.
Test-pull your installation:
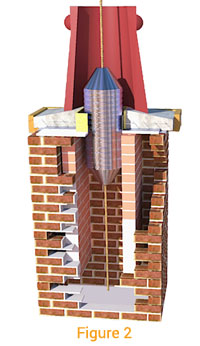
To ensure your flexible liner will pass cleanly through the chimney, we would advise a “test-pull”. This means using a test piece (we suggest a minimum of 1mtr) of the correct diameter flexible liner that you wish to install. Connect a nose cone to both ends of the test piece with drawstrings attached, long enough for the length of the chimney, then pass the liner through your chimney in the direction you intend to install it. If your test-pull is successful, whereby the diameter liner fits your chimney stack and you do not encounter any blockages, you should continue your installation without any problems. (See Figure 2).
Site preparation and cutting the liner:
Please wear heavy-duty gloves when handling the flexible liner as it has very sharp edges and could injure at ease if handled incorrectly. Using a hacksaw is the most common way to cut flexible liner. Ensure you secure the liner on a solid and secure flat surface, using tin snips to tidy up any rough ends. Once your liner has been cut, tape the ends using duct tape which will help ensure you do not cut yourself whilst installing the liner. Remove the tape once it has been installed. (See Figure 3).
Please ensure you have the appropriate working platform in place on the roof to enable a safe installation of your liner. Health and safety must be at the forefront of your mind when installing and handling your flexible liner.
Please note:
The liner should not be fitted directly to the appliance. A short length of either vitreous or 316 stainless steel (preferably with a clean-out door for sweeping) should be fitted from the appliance to the liner adaptor.

Fitting your flexible liner:
You can install your flexible liner either from the top or bottom of the brick chimney stack. Whichever way you choose to install the liner, please ensure that you have sufficient clearance around the outside of the liner to ensure the least amount of friction, or possibility of catching any bricks within the chimney stack, does not occur.
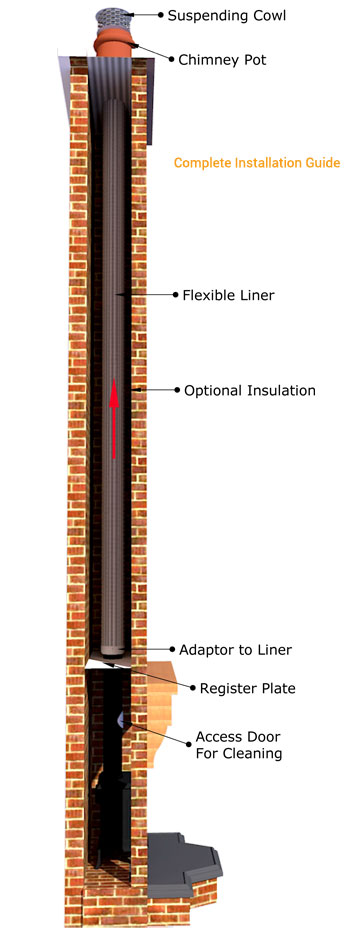
Unpack your flexible liner and, attaching a drawstring to the nose cone, (making sure it is long enough to reach the bottom of the stack), connect the nose cone to the end of the liner using gaffer tape. Ensure the arrows marked on the liner are facing an upward direction (representing the direction of flue gases). (See “Completed install” diagram).
The inside of a flue liner is designed to be like weather-boarding on a building, with each board overlapping the next. The idea of the lap on the inside is so that any soot/tar/creosote that runs back down the liner will run over the joints. The diagram on the left shows how the liner is designed to do this.
You will need two people to install your liner successfully, one at either end of the chimney stack. From the top of the roof, start to push the liner, nose cone first, down the stack. The person at the bottom of the stack should hold the string and take up the slack. Work in tandem to feed the liner down the chimney stack, ensuring you leave enough liner at the bottom to secure your adaptor and enough at the top to secure the top fixings. (See “Completed install” diagram).
Insulation materials:
Flue Supplies recommends you back fill your chimney with either Vermiculite or alternatively, Rockwall insulation. Rockwall comes in fixed 1mtr lengths, 25mm thick, whilst the Vermiculite is a loose-fill material which is much easier to install with your liner. Both materials increase the efficiency of your chimney and will help avoid any corrosion of your liner.
Another alternative is air-gap venting. This is a simple way to maintain the air gap simply by inserting 2x 15mm copper pipes horizontally at the top of the chimney stack. You must not however, exceed a venting area of 52cm.
Annual maintenance:
All chimneys should be swept and inspected by a competent person at least once every year (often more depending on the fuel you are burning). Your chimney could suffer from soot build-up within the flexible liner, especially if wet, unseasoned wood, coal or low grade fuels have been used. To ensure your liner is safe to use, a yearly sweep (using a polypropylene brush not a metal wire brush which can potentially damage the liner) and the annual inspection reduces the chance of soot build-up and therefore reduces the chance of a chimney fire. Any chimney fire could affect the structural strength of your liner and should be inspected after any chimney fire occurs.
The correct type and size of brush for the liner must be used when cleaning; a brush too big could potentially get stuck. Flue Supplies recommends a polypropylene brush not a metal wire brush as this could actually damage the liner. You must not use chemical cleaners. (See Figure 1).
Your flexible liner is constructed from either 316 or 904 stainless steel and has been tested to EN-1856 (CE Approved) and will withstand constant operating temperatures of 540° C, and 760°C on short fire operation.
Legal requirements:
On completion of the installation it should be commissioned with appropriate requirements, including a smoke test. This will check for any leaks or substantial spillages from the liner which will need rectifying before the appliance is used.
It is a legal requirement to fit a chimney notice plate on any installation or modification to your existing installation. Your notice plate should be fitted either in your utility meter cupboard or close to the fire or woodstove. You should never cover this plate.
Also, a carbon monoxide detector and an air vent should be installed in the same room as the appliance. Please refer to the Document J Building Regulations for more details.
Please Note: Flue Supplies does not know the exact situation or circumstances of your home and/or quality of the products already in place. Although the advice and the quotation provided will be based on the details submitted by you, any person who relies upon any advice provided by Flue Supplies given by email, phone or which is contained in any of the Flue Supplies website, does so at their own risk. Flue Supplies therefore accepts no duty or liability whatsoever, other than a duty to act honesty in good faith.